
Polishing Glass Edges Like a Pro Step-by-Step
Mastering polishing glass edges like a pro involves a systematic, multi-stage process that combines mechanical precision with a deep understanding of the material. This is the final, critical step that transforms a functional, ground edge into a brilliant, optically clear, and aesthetically perfect finish. It is a value-adding process that signifies the highest level of quality in glass fabrication. This definitive guide provides a step-by-step explanation of the professional techniques, tools, and parameters required. It details how to consistently achieve a flawless, durable, and beautiful polished edge on any glass product.
What is the Core Principle of Polishing Glass Edges?
The core principle of polishing glass edges is the systematic removal of microscopic surface imperfections. This is achieved through a controlled, sequential process that moves from coarse grinding to fine polishing. The goal is to transform a rough, opaque edge into a smooth, transparent surface that is both strong and visually appealing. This is not a single action but a journey of gradual refinement. Each step carefully prepares the surface for the next, more delicate stage.
How Does Polishing Go Beyond Simple Sanding?
Polishing goes far beyond simple sanding. A basic process, like that of a glass edge sanding machine, is designed primarily for safety. It removes the razor-sharp arrises left after cutting. Polishing is a far more sophisticated process. It aims to achieve optical clarity and a brilliant shine. It involves a chemo-mechanical action that smooths the glass at a microscopic level. This restores its natural transparency and creates a high-end, finished look.
Why is a Polished Edge Stronger?
A polished edge is significantly stronger because the process removes the microscopic flaws, known as Griffith flaws, that are created during cutting and grinding. These flaws act as stress concentration points. They are the starting points from which cracks can propagate under stress. The polishing process effectively removes this weakened surface layer. It creates a smooth, flaw-free edge that is much more resistant to chipping, thermal shock, and mechanical stress. A polished edge is a safe and durable edge.
What is the Science Behind a Perfect Shine?
The science behind a perfect shine is a chemo-mechanical process. The final polishing stage uses a compound called cerium oxide. This rare earth oxide reacts chemically with the silica in the glass. This reaction creates a softened, hydrolyzed layer on the very surface of the edge. A rotating felt wheel then provides the mechanical action. It wipes this softened layer away. This action, repeated thousands of times per second, smooths out the microscopic peaks and valleys. This leaves behind an incredibly smooth, optically clear surface that we perceive as a brilliant shine.
What is the Crucial Pre-Polishing Preparation?
The quality of the final polish is entirely dependent on the quality of the preparation that precedes it. You cannot achieve a flawless polish on a poorly prepared edge. The pre-polishing stages of grinding and fining are non-negotiable. They create the smooth, consistent foundation upon which the final shine is built. Rushing or skipping these foundational steps is the most common cause of polishing defects.
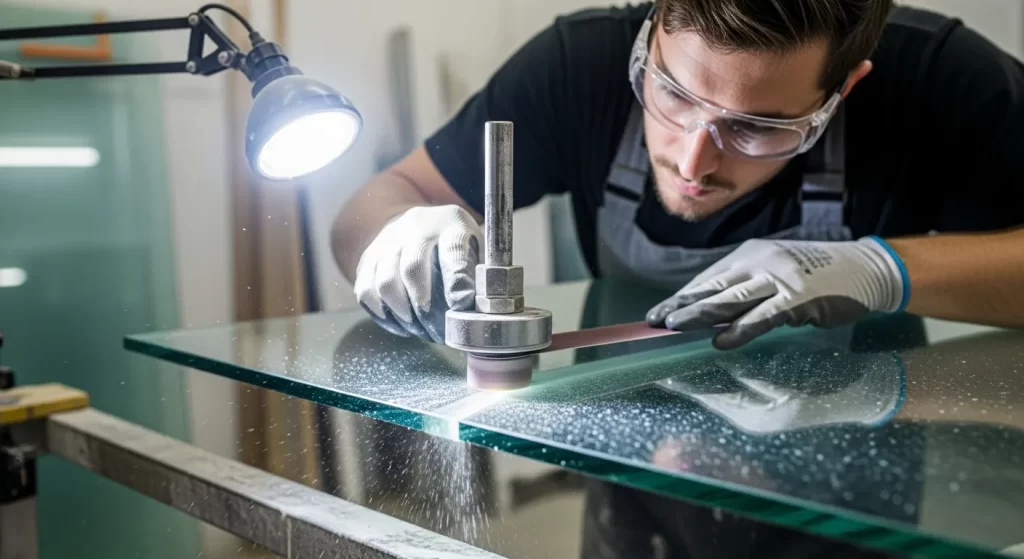
How Does the Process Begin with Grinding?
The process begins with grinding immediately after the glass is cut. The purpose of grinding is to shape the edge into the desired profile, such as a flat or pencil edge. This is an aggressive material removal stage. It uses coarse, metal-bonded diamond wheels. This stage is detailed in our guide on glass edge grinding vs. beveling. While grinding establishes the shape, it leaves the surface rough and opaque. It is a necessary first step, but it is far from the finished product.
What is the Critical Intermediate Step of Fining?
The critical intermediate step of fining, also known as honing, is the bridge between rough grinding and final polishing. This stage uses one or more resin-bonded diamond wheels. These wheels have a much finer grit than the initial grinding wheels. Their sole purpose is to remove the deep scratches and fractures left by the coarse grinding process. The fining stage transforms the rough, opaque edge into a smooth, semi-transparent, or "satin" finish. This smooth surface is now properly prepared for the final polishing wheels.
Why Can Fining Not Be Skipped?
The fining stage cannot be skipped because the final polishing wheels are not designed to remove deep scratches. A felt polishing wheel will simply polish over the existing scratches, making them even more noticeable. It would be like trying to apply a high-gloss paint finish to a rough, unsanded piece of wood. The fining stage does the hard work of smoothing the surface. The polishing stage then provides the final brilliance. A commitment to this complete, multi-stage process is a key part of achieving glass beveling and edging mastery.
What Are the Essential Tools and Materials for Polishing?
Professional glass polishing relies on a specific set of high-quality tools and consumables. The selection and maintenance of these components are just as important as the machine itself. The polishing wheels, the cerium oxide compound, and the coolant system all work together. A weakness in any one of these areas will compromise the quality of the final finish.
What Are the Different Types of Polishing Wheels?
The polishing process uses a sequence of specialized wheels.
- Resin-Bond Fining Wheels: These are the pre-polishing wheels. They contain fine diamond grits (e.g., 200-400 grit) held in a resin matrix. They are essential for removing the scratches from the grinding stage.
- Felt Polishing Wheels: These are the primary wheels for achieving the final shine. They are made from highly compressed natural or synthetic felt. They are designed to be used with a cerium oxide slurry.
- Synthetic or Rubber-Based Polishing Wheels: These are often used as the very last wheel in the sequence. They are made from a proprietary composite material. They can produce an exceptionally brilliant, "wet look" finish.
Why is Cerium Oxide the Polishing Compound of Choice?
Cerium oxide is the industry-standard polishing compound due to its unique chemical properties. It is a rare earth oxide that has a specific affinity for silica, the primary component of glass. Its effectiveness is determined by its purity, the size and shape of its particles, and its concentration in the slurry. High-purity cerium oxide with a consistent particle size will polish faster. It will also produce a higher-quality finish with fewer defects. The global demand for rare earth oxides for industrial polishing is significant.
How is the Slurry System Managed?
The slurry system is a closed-loop system designed to manage the expensive cerium oxide compound. It consists of a large reservoir tank, a pump, and a filtration system. The slurry is pumped from the tank to the polishing wheels. The runoff is collected and returned to the tank. The filtration system is critical. It removes the fine glass particles from the slurry. This prevents these particles from causing scratches. It also allows the cerium oxide to be recirculated, which dramatically reduces operational costs. A well-maintained slurry system is key to consistent, cost-effective polishing.
What is the Step-by-Step Automated Polishing Process?
The polishing glass edges like a pro step-by-step process is best exemplified by the operation of an automatic edging or beveling machine. These machines automate the entire sequence. They move the glass through a series of wheels to achieve a perfect finish with minimal human intervention. This automated workflow is the key to both quality and productivity in a modern fabrication setting.
How Does a Straight-Line Edging Machine Automate the Process?
A straight-line edging machine automates the process using an assembly-line approach. The glass sheet is fed into the machine on a conveyor. It is clamped securely and moved past a series of fixed-position spindles. The first spindles hold the coarse grinding wheels. These are followed by the finer fining wheels. The final spindles in the line hold the felt polishing wheels, which are fed by the cerium oxide slurry system. As the glass exits the machine, its edge has been completely transformed from raw to perfectly polished. A complete overview of this machine can be found in our straight-line beveling machine overview, which shares many of the same principles.
How Does a CNC Machine Automate the Process?
A CNC (Computer Numerical Control) machine automates the process for custom shapes. The glass is held stationary on a vacuum table. A computer-controlled tool head moves around the perimeter of the glass. The machine uses an Automatic Tool Changer (ATC) to cycle through the required sequence of wheels. It will first use the grinding wheels to shape the edge. It will then automatically switch to the fining wheels. Finally, it will select the polishing wheels to complete the job. This programmability allows for a perfect polish on circles, ovals, and complex free-form designs.
What is the Complete Wheel Sequence in an Automatic Machine?
The complete wheel sequence in a typical high-quality automatic machine is a model of gradual refinement. A machine with nine spindles, for example, might have a configuration like this:
- Spindles 1-3: Coarse and medium-grit metal-bonded diamond wheels for rough grinding and shaping.
- Spindles 4-6: Fine-grit resin-bonded diamond wheels for the fining and honing stages.
- Spindles 7-9: Felt polishing wheels, often of increasing softness, for the final cerium oxide polish. This progression ensures that each stage properly prepares the surface for the next. The number of wheels is a key factor when you choose the best glass edger for your workshop.
How Do You Master the Key Machine Parameters?
Mastering the key machine parameters is essential for optimizing the polishing process for both quality and efficiency. The operator must have precise control over the machine's feed rate, the spindle speed, and the pressure applied by the wheels. Finding the perfect balance between these variables is what separates an average finish from a professional-grade, flawless shine. This level of control is a key feature of any modern automatic glass beveling machine explained in detail.
How Does Feed Rate Impact the Quality of the Polish?
The feed rate, which is the speed at which the glass moves through the machine, is a critical parameter. A feed rate that is too fast is a common cause of a poor-quality polish. It does not give the polishing wheels enough time to effectively smooth the surface. This results in a hazy or cloudy finish. A slower feed rate allows for more contact time. This produces a more brilliant and consistent shine. The operator must find the optimal feed rate. This rate should maximize production speed without compromising the required quality standard. The effect of feed rate is a major factor in the overall process.
What is the Optimal Spindle Speed for Polishing Wheels?
The optimal spindle speed for polishing wheels is a delicate balance. The speed must be high enough to generate the necessary friction and chemo-mechanical action. However, a speed that is too high will generate excessive heat. This can damage the felt wheel. It can also "burn" the glass edge, leaving a permanent white mark. The ideal RPM range depends on the diameter and type of the polishing wheel. It is typically set according to the manufacturer's specifications. It is generally lower than the speeds used for the initial grinding stages.
Why is Consistent Wheel Pressure So Important?
Consistent wheel pressure is crucial for a uniform polish. Modern automatic machines use a pneumatic or electronic system to apply a precise and constant amount of pressure to each wheel. If the pressure is too low, the polish will be ineffective. If the pressure is too high, it can generate excess heat. It can also cause the wheel to wear out prematurely. The machine's ability to maintain this exact pressure as the wheel moves along the glass edge, even around corners, is a key advantage over manual methods.
What Are the Professional Techniques for Different Edge Profiles?
The fundamental polishing process is adapted to create different edge profiles. The most common professional profiles are the flat polish and the pencil polish. Each requires a specific set of shaped wheels to achieve its unique contour. A more complex decorative edge, like a bevel, also requires its own specialized polishing technique.
How Do You Achieve a Perfect Flat Polished Edge?
A perfect flat polished edge is achieved by using a series of flat-faced wheels. The grinding, fining, and polishing wheels all have a flat profile. The machine is set up to create a 90-degree edge relative to the glass surface. The final polishing wheels ensure this flat surface is brilliantly transparent. The process also includes small, 45-degree arrising wheels. These wheels lightly grind and polish the sharp top and bottom corners. This creates a safe, clean, and highly professional finish.
What is the Technique for a Pencil Polished Edge (C-Edge)?
The technique for a pencil polished edge involves using a set of concave, "U-shaped" wheels. These wheels have a profile that matches the desired rounded edge. The glass edge is passed through this sequence of shaped wheels. The coarse grinding wheel creates the initial rounded shape. The finer fining and polishing wheels then smooth and polish this curve to a brilliant shine. This profile is often used for its soft, elegant appearance on mirrors and furniture.
How is Polishing Applied to a Beveled Edge?
Polishing is the final and most important step in creating a beveled edge. After the bevel has been ground to the correct angle and width, a series of angled polishing wheels are used. These wheels are mounted at the same angle as the bevel. They are shaped to match the flat, angled surface. They use cerium oxide to polish the bevel to an optical finish. This is what creates the brilliant, prismatic effect that defines a beveled glass edge. The process is a key part of how glass beveling machines work.
How Do You Ensure Safety When Polishing Glass Edges?
Ensuring safety when polishing glass edges is paramount. The automated nature of modern machinery has made the process much safer than manual methods. However, adherence to strict safety protocols is still essential. This involves personal protective equipment, machine safety features, and a clean working environment. The guide on how to polish the edge of glass safely provides a comprehensive overview of these critical measures.
What Personal Protective Equipment (PPE) is Required?
The required PPE includes safety glasses with side shields, waterproof gloves, and slip-resistant footwear. Safety glasses protect the eyes from coolant splash and any potential small glass chips. Waterproof gloves protect the hands from the cerium oxide slurry and from sharp edges during handling. The area around a glass polishing machine is often wet. Therefore, slip-resistant, waterproof safety boots are essential to prevent slips and falls. Hearing protection may also be necessary depending on the noise level of the machine.
What Are the Key Machine Safety Features?
Key machine safety features include the full enclosure, emergency stop buttons, and electrical interlocks. The enclosure contains all the coolant splash and slurry. It also provides a physical barrier between the operator and the high-speed rotating components. Emergency stop buttons are located in accessible positions around the machine. They can instantly halt all machine motion in an emergency. Electrical interlocks on the enclosure doors prevent the machine from starting or running if a door is open.
How Does a Clean Workshop Contribute to Safety?
A clean workshop is a safe workshop. The area around the polishing machine should be kept free of clutter and spills. The floor should be regularly cleaned to remove any slippery coolant or slurry residue. Good housekeeping not only prevents slips and falls. It also reduces the risk of abrasive glass dust contaminating other processes or equipment. A culture of cleanliness is a cornerstone of a safe and professional manufacturing environment.
How Do You Troubleshoot Common Polishing Defects?
Troubleshooting common polishing defects requires a systematic approach. Most defects, such as a hazy finish or scratches, are caused by a problem in one of three areas: the machine parameters, the consumables, or the pre-polishing preparation. By logically diagnosing the potential causes, an operator can quickly resolve the issue and return to producing high-quality work.
What is the Cause of a Hazy or "Cloudy" Finish?
A hazy finish is the most common polishing defect. The primary causes are a feed rate that is too fast, a worn-out polishing wheel, or a poor-quality slurry. If the glass moves past the polishing wheels too quickly, they do not have enough time to work. A felt wheel that has become overly compressed or glazed will also be ineffective. Finally, a slurry with a low concentration of cerium oxide or one that is contaminated will not produce a good shine.
How Can You Prevent Scratches and "Drag Marks"?
Scratches or drag marks are almost always caused by contamination. A stray abrasive particle from the grinding stage can get into the slurry system. It can then be dragged along the edge by the polishing wheel, creating a long scratch. This is why a high-quality, well-maintained filtration system is so important. Scratches can also be a sign that the fining stage was not sufficient. If it did not remove all the deep grinding marks, the polishing wheel will not be able to fix them.
What Causes "Burning" or White Marks on the Edge?
Burning is a permanent white mark on the edge. It is caused by excessive localized heat. The most common cause is an interruption in the coolant flow. A clogged nozzle or low slurry level can lead to burning in seconds. Other causes include excessive wheel pressure or a spindle speed that is too high. A feed rate that is too slow, causing the wheel to dwell in one spot for too long, can also generate enough heat to burn the glass. A detailed look at these issues can be found in our guide to common beveling problems and solutions.
Conclusion
The process of polishing glass edges like a pro is the culmination of the entire glass fabrication workflow. It is a process where science, technology, and skill converge to create a product of exceptional quality and beauty. By understanding the core principles of the multi-stage process, mastering the essential tools and materials, and meticulously controlling the machine parameters, any workshop can achieve a flawless finish. This commitment to a perfect polish is what defines a truly professional operation. It is the final signature of quality on every piece of glass that leaves the factory.