
The Complete Glass Edge Sanding Machine Guide for Beginners
This glass edge sanding machine guide provides essential knowledge for anyone new to glass fabrication. It explains the foundational process of making a raw, cut edge safe to handle. A glass edge sanding machine, often called an arrissing machine, is the primary tool for this critical first step. It uses an abrasive belt to lightly dull the razor-sharp corners of a glass sheet. This guide offers a comprehensive, step-by-step overview. It covers the machine's purpose, its operation, safety procedures, and its vital role in the broader context of professional glass finishing.
What is the Fundamental Purpose of a Glass Edge Sanding Machine?
The fundamental purpose of a glass edge sanding machine is to ensure safety.1 After a sheet of glass is cut, its edges are incredibly sharp and dangerous.2 The sanding process, also known as seaming or arrissing, removes this sharp edge.3 It creates a dulled, smooth corner that is safe to handle, transport, and install. This is the most basic and essential step in glass edge finishing.
How Does Sanding Differ from Polishing?
Sanding differs from polishing in its goal and its resulting finish.4 Sanding is a purely functional process. It uses coarse abrasives to make the edge safe. The resulting finish is a matte, opaque, or frosted look. Polishing is a multi-stage aesthetic process. It uses a sequence of progressively finer wheels to create a brilliant, optically clear, and transparent edge. This is detailed in our guide to polishing glass edges like a pro. Sanding is for safety; polishing is for beauty.
What is the Difference Between Sanding and Grinding?
The difference between sanding and grinding lies in the aggressiveness and purpose of the action. Sanding is a very light abrasive process. It is focused only on dulling the sharp corners, or arrises. Grinding is a much more aggressive, formative process. It uses coarse diamond wheels to shape the entire edge profile, such as creating a flat or pencil edge. Grinding removes significant material.5 Sanding is a delicate touch for safety. The guide glass edge grinding vs beveling explores these formative processes in more detail.
Why is a Sanded Edge Called a "Seamed Edge"?
A sanded edge is often called a "seamed edge" in the glass industry.6 This term refers to the small, flat surface, or "seam," that is created on the corner when the sharpness is sanded off. When a professional specifies a "seamed edge," they are requesting this basic safety finish.7 It is the minimum standard for any piece of glass that will be handled. It is the most economical edge finish available.
What Are the Main Types of Glass Edge Sanding Machines?
Glass edge sanding machines come in two primary types. These are portable handheld sanders and stationary benchtop belt sanders. Each type is suited for different applications, work environments, and scales of production. The choice between them depends on the user's need for portability versus the stability and power of a fixed machine.
How Do Portable Handheld Sanders Work?
Portable handheld sanders are lightweight, electrically powered tools.8 They use small abrasive belts that are driven by a motor within the tool's housing. The operator holds the tool and moves it along the edge of the glass. These tools are excellent for on-site work, for touching up edges on already installed glass, or for working on very large, heavy sheets of glass that are difficult to move. Their main advantage is their portability.
What Defines a Stationary Benchtop Sander?
A stationary benchtop sander is a more robust machine. It is designed to be mounted to a workbench. It consists of a motor that drives a larger, continuous abrasive belt around a series of wheels. The operator holds the piece of glass and moves it against the moving belt. These machines offer more power and stability than handheld models. They are the standard choice for workshops and studios where glass is brought to the machine. They often include an integrated coolant system.
What are the Key Differences in a Comparison?
The key differences between the two types are clear. The choice depends on the specific needs of the workshop.
| Feature | Portable Handheld Sander | Stationary Benchtop Sander |
| Primary Use | On-site work, large stationary glass. | Workshop production, consistent results. |
| Operation | The tool moves, the glass is stationary. | The glass moves, the tool is stationary. |
| Power | Lower power. | Higher power. |
| Stability | Depends on operator skill. | Very high stability. |
| Coolant System | Typically requires a manual water spray. | Often has an integrated coolant system. |
| Cost | Generally less expensive. | Generally more expensive. |
How Does a Glass Edge Sanding Machine Work?
A glass edge sanding machine works by using a moving abrasive belt to gently abrade the sharp corners of a cut piece of glass. The process is always performed wet. A continuous supply of water acts as a coolant and lubricant. This prevents heat buildup and ensures a smooth sanding action. The simplicity of this mechanism is what makes it such a reliable and essential tool in any glass workshop.
What is the Role of the Abrasive Belt?
The abrasive belt is the cutting tool of the machine. These belts are typically made from a durable, waterproof cloth backing. They are coated with hard, sharp abrasive particles. The most common abrasive used for glass is silicon carbide. This material is very hard and sharp. It is effective at abrading glass cleanly without being overly aggressive. The belts come in various grit sizes.9 A coarser grit (like 80-grit) removes material faster.10 A finer grit (like 120 or 220-grit) produces a smoother, more refined seamed edge.
Why is Water (Coolant) Absolutely Essential?
Water is absolutely essential when sanding glass for two critical reasons. First, it acts as a coolant. The friction between the abrasive belt and the glass generates a significant amount of heat. Without water to dissipate this heat, the glass would experience thermal shock. This would cause it to crack or break. Second, the water acts as a lubricant and a flushing agent. It helps the belt to cut more smoothly. It also washes away the fine glass powder that is created during the sanding process. Sanding glass dry is extremely dangerous and will ruin the workpiece.
What Are the Basic Components of a Benchtop Machine?
A typical stationary benchtop sander has several key components.
- The Motor: An electric motor provides the power to drive the belt.11
- The Drive System: A system of wheels or rollers, including a drive wheel and an idler wheel, supports and moves the abrasive belt.12
- The Platen: This is a flat, solid support plate located behind the abrasive belt in the main working area. It provides a firm backing for the belt.
- The Work Table: A small, adjustable table in front of the platen supports the glass during sanding.
- The Coolant System: A nozzle and a collection tray manage the flow and capture of the water coolant.
What is the Step-by-Step Guide to Using a Sanding Machine Safely?
Following a systematic, step-by-step process is the key to how to polish the edge of glass safely, and the same principles apply to the preparatory sanding stage. Safety is the primary reason for sanding a glass edge. Therefore, the process itself must be conducted with the utmost attention to safety protocols. This guide provides a clear, professional workflow for safe and effective operation.
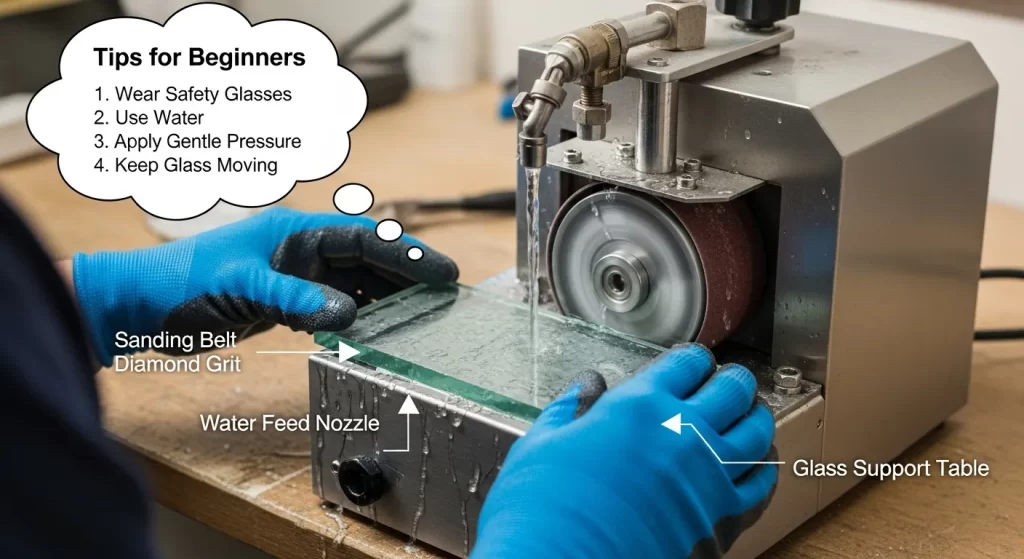
Step 1: How Do You Prepare for the Task (Safety First)?
Preparation begins with putting on the mandatory Personal Protective Equipment (PPE). This is a non-negotiable first step.
- Eye Protection: Wear safety glasses with side shields at all times.
- Hand Protection: Wear waterproof, cut-resistant gloves. These protect your hands from both the sharp glass and the wet environment.
- Body Protection: Wear a waterproof apron to stay dry.You must also prepare the work area. Ensure the machine is stable on the workbench. The floor around the machine should be clean and dry. Make sure the lighting is good.
Step 2: What is Involved in Setting Up the Machine?
Setting up the machine involves a few simple checks. First, inspect the abrasive belt. Ensure it is in good condition, without any tears or excessive wear. Make sure it is tracking correctly in the center of the wheels. Second, prepare the coolant system. If it is a recirculation system, ensure the tank is full of clean water. If it is a drip system, fill the reservoir. Turn on the water flow and adjust it so there is a steady stream running over the belt in the working area.
Step 3: What is the Correct Technique for Sanding the Edge?
The correct technique requires a light, consistent touch.
- Hold the Glass: Grip the piece of glass firmly with both hands. Keep your fingers away from the edge that you will be sanding.
- Approach the Belt: Bring the glass to the moving belt. The belt should be moving downward, away from the edge you are sanding.
- Apply Light Pressure: Hold the corner of the glass against the belt at approximately a 45-degree angle. Apply very light pressure. You are only trying to dull the sharpness, not remove a lot of material.
- Use a Smooth Motion: Move the glass smoothly and steadily along the belt. Do not stop or dwell in one spot. This will create a flat spot or an uneven seam.
- Sand Both Corners: Repeat the process for both the top and bottom corners of the edge.
Step 4: How Do You Inspect the Finished Seamed Edge?
After sanding all the edges, you must inspect your work. First, turn off the machine. Then, carefully clean and dry the piece of glass. The seamed edge should feel smooth to a gloved touch. It should not feel sharp. Visually, the seam should be a thin, uniform, matte white line along the corner of the glass. The line should be consistent in width. There should be no missed spots or deep scratches.
How Does Sanding Compare to Other Finishing Processes?
Understanding where sanding fits within the hierarchy of glass finishing is crucial for any fabricator. It is a foundational process, but it is not a decorative one. Its relationship to grinding, polishing, and beveling defines its role in a professional workshop. This knowledge is essential for specifying the correct finish for any given application.
Sanding vs. Grinding: What is the Key Distinction?
The key distinction is function versus formation. Sanding is a light, functional process for safety. Grinding is an aggressive, formative process for shaping. A detailed look at this can be found in the glass edge grinding vs beveling comparison. Grinding removes significant material to create a profile. Sanding just "breaks the edge" to remove its sharpness.
Sanding vs. Polishing: How Do the Goals Differ?
The goals of sanding and polishing are entirely different. The goal of sanding is to create a safe, non-sharp edge with a simple matte finish. The goal of polishing is to create a brilliant, transparent, and aesthetically perfect edge. A polished edge is always sanded and ground first. Sanding is a preparatory step. Polishing is the final, value-adding finish.
Sanding vs. Beveling: What is the Visual and Functional Difference?
Sanding and beveling exist at opposite ends of the finishing spectrum. Beveling creates a wide, decorative, angled face on the glass. This is designed to refract light. The glass beveling vs edging difference guide highlights that beveling is a complex, multi-stage decorative process. Sanding is a simple, single-stage safety process.
What Are the Main Benefits of Using a Glass Edge Sander?
The benefits of using a glass edge sanding machine, particularly for a small workshop, hobbyist, or as a first step in a larger process, are significant. The primary benefit is a dramatic improvement in safety. However, it also offers advantages in terms of handling, cost-effectiveness, and process control.
How Does it Dramatically Improve Safety?
The machine dramatically improves safety by removing the single greatest hazard associated with cut glass: its razor-sharp edge.14 A raw, cut edge can cause severe lacerations with even the slightest touch. A properly seamed edge can be handled with confidence. This makes the entire workshop environment safer. It reduces the risk of injury during handling, transport, and installation. This safety improvement is its most important benefit. The number of workplace injuries related to cuts from glass is a significant concern in the industry.
How Does it Improve Handling and Reduce Breakage?
A seamed edge improves handling and reduces the risk of further breakage.15 The sharp corners of a raw cut are points of high stress.16 They are very fragile and prone to chipping. Sanding the edge removes these stress risers.17 This makes the edge more robust and less likely to chip during handling or when being set into a frame. This reduction in incidental breakage can lead to significant cost savings by reducing material waste.
Why is it a Cost-Effective Solution?
A glass edge sanding machine is a very cost-effective solution. The initial investment in the machine is relatively low compared to more complex grinding and polishing equipment. The abrasive belts are an inexpensive and easily replaceable consumable. This makes it a highly accessible technology. It is often the very first piece of finishing equipment a new glass shop will purchase. Its low operational cost makes it an essential and profitable tool.
What Are the Essential Maintenance and Troubleshooting Tips?
Like any piece of machinery, a glass edge sander requires some basic maintenance to keep it running safely and effectively.18 Most issues that arise are simple to diagnose and can be solved with routine adjustments and care. A proactive approach to maintenance is the best way to ensure the machine is always ready for use.
How Do You Change and Track an Abrasive Belt?
Changing an abrasive belt is a routine task. Most machines have a tension release lever that allows the old belt to be slipped off easily. When installing a new belt, it is important to check the direction arrow printed on the inside of the belt. It must be installed to run in the correct direction. After installing the new belt, the machine's tracking adjustment knob must be used. This knob adjusts the angle of the idler wheel. It is used to center the moving belt on the wheels so that it does not rub against the machine's frame.
How to Maintain the Coolant System?
Maintaining the coolant system is crucial. For a simple drip system, the nozzle must be kept clean and free of debris. For a recirculation system, the water in the collection tray or tank should be changed regularly. The fine glass powder will form a sludge at the bottom of the tank. This should be cleaned out periodically. A clean water supply provides better cooling and results in a smoother seamed edge.
What Are Common Problems and Their Solutions?
Most common problems are easy to fix.
- Uneven Seam: This is usually caused by inconsistent operator pressure or a worn, uneven spot on the machine's platen.
- Belt Slipping: This is caused by incorrect belt tension. Most machines have a spring-loaded tensioning system that should be checked.
- Belt Not Tracking: This requires adjusting the tracking knob. If the belt still will not track correctly, it may indicate a problem with the wheel bearings or alignment.
- Excessive Chipping: This can be caused by using a belt with a very coarse grit, applying too much pressure, or having an insufficient water supply.
Conclusion
This glass edge sanding machine guide demonstrates that this simple machine is the true starting point for all professional glass work. It is the foundational tool that bridges the gap between a raw, dangerous cut and a safe, workable piece of material. While it does not produce the brilliant finish of a polisher or the decorative flair of a beveler, its role is arguably the most important. By providing a safe, stable, and cost-effective method for preparing glass edges, the sanding machine empowers fabricators to handle their material with confidence. It is the first, essential step on the path to glass beveling and edging mastery.