
Etching Glass with a Laser Cutter: Your 2025 Guide
Have you ever held a glass etched with a delicate pattern and wondered how it was made? Maybe it was a personalized wine glass or a frosted window panel that caught your eye. Laser cutters make those stunning designs possible, turning plain glass into art with precision and ease. In 2025, etching glass with a laser cutter is more approachable than ever, whether you’re a hobbyist crafting gifts or a business creating custom decor. It’s like having a magic wand that carves your ideas into glass without breaking a sweat.
In this guide, I’ll walk you through the ins and outs of etching glass with a laser cutter. We’ll explore how it works, the best machines for the job, creative uses, and tips to get it right. I’ll also compare laser etching to other methods like sandblasting to help you choose the best approach. By the end, you’ll be ready to start etching your own glass projects. Let’s jump in!
How Does Laser Etching on Glass Work?
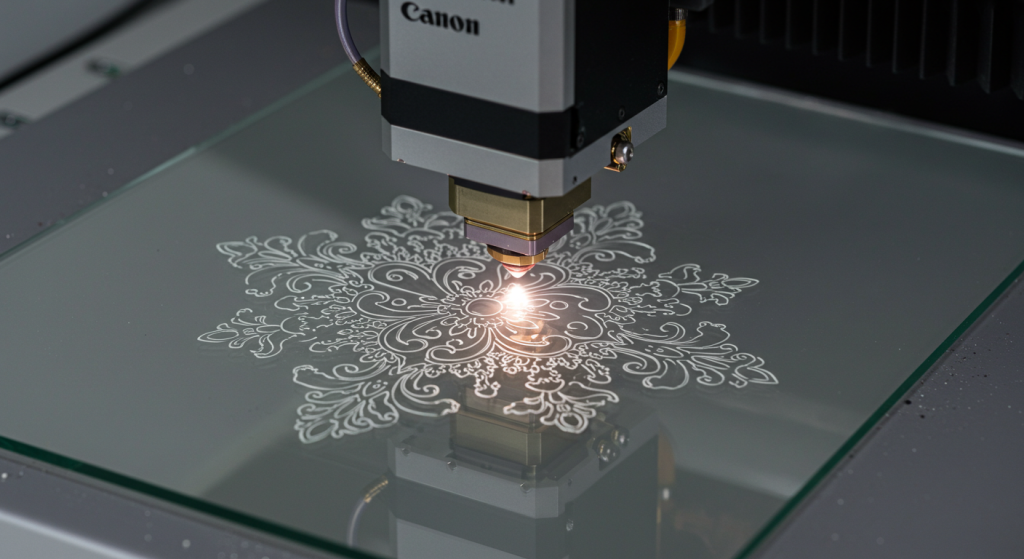
Laser etching on glass is like drawing with a super-focused beam of light. A laser cutter—usually a CO2 model—shoots a concentrated beam that gently fractures or vaporizes the glass surface, creating a frosted, etched effect. The result is a crisp design, like a logo, text, or intricate pattern, that looks elegant and feels smooth. Unlike tools that grind or scrape, lasers don’t touch the glass, so there’s less chance of cracking delicate pieces, as explained by Trotec.
The process starts with your design. You create it in software like LightBurn or RDWorks, tweak settings like power and speed, and place your glass in the laser cutter. If you’re etching a curved item like a bottle, a rotary attachment spins it to keep the laser focused. The laser then traces your design, etching it in minutes. For example, a 40W CO2 laser can etch a 50x50mm logo on a glass in about 2-5 minutes, per OMTech.
Glass doesn’t burn like wood—it’s more about creating micro-cracks for that frosted look. A neat trick is to cover the glass with a wet paper towel before etching. This keeps the surface cool, reduces roughness, and gives a bright white etch, as suggested by BNMACHINE. After etching, rinse off any residue, and your design is ready to shine.
Laser Etching vs. Sandblasting: Which Is Better?
You might be curious how laser etching compares to sandblasting, another go-to for glass etching. Both create frosted designs, but they’re different beasts. Let’s break it down to see which suits your needs.
Sandblasting uses high-pressure abrasives, like aluminum oxide, to roughen glass through a stencil. It’s awesome for deep, textured etches or large surfaces, like privacy panels for offices. But it’s messy, needs a compressor and cabinet, and requires protective gear to avoid inhaling dust, as noted in Delphi Glass’s guide.
Laser etching, by contrast, is clean and precise. It’s perfect for tiny details, like a name on a wine glass, and doesn’t require abrasives or stencils. You can set up in a small space without worrying about dust clouds. The catch? Lasers are less suited for deep, uniform frosting over huge areas, where sandblasting excels.
Here’s a quick comparison table to make it clear:
| Feature | Laser Etching | Sandblasting |
|---|---|---|
| Precision | Super high (up to 1200 DPI) | Decent (depends on stencil) |
| Setup | Laser cutter, software, small space | Compressor, cabinet, abrasives, gear |
| Speed | Fast (2-5 min for small designs) | Slower (setup and cleanup take time) |
| Depth | Surface etch (0.01-0.1mm) | Deep etch (up to 1mm) |
| Cost | $500-$50,000 (machine-dependent) | $1,000-$6,000 (setup-dependent) |
| Best For | Detailed designs, small projects | Large areas, deep textures |
If you’re a hobbyist or small business wanting precision and simplicity, laser etching is your friend. For industrial-scale frosting, sandblasting might be the better pick.
Types of Laser Cutters for Glass Etching
Picking the right laser cutter is key to great glass etching. Here’s a rundown of the main types available in 2025, so you can find one that fits your projects:
CO2 Laser Cutters
CO2 lasers (40W-150W) are the top choice for glass etching. They create frosted designs on flat glass, mirrors, or bottles with high accuracy. Models like the xTool P2 (55W) or Glowforge Pro handle glassware to small panels, with work areas up to 495x279mm. They’re versatile and popular for most users.
Fiber Laser Cutters
Fiber lasers (20W-50W), like the xTool F1, are better for coated or painted glass, where they burn off layers for deeper etches. They’re less common for clear glass but great for industrial or hybrid materials. Expect to spend $3,000 or more.
Diode Laser Cutters
Diode lasers (5W-20W), such as the Longer Ray5, are budget-friendly but need pre-treatment (like paint or marking paper) to etch glass, as their 450nm wavelength passes through clear glass. They’re ideal for small projects like coasters, starting at $500.
Industrial Laser Cutters
For big operations, industrial CO2 or fiber lasers, like the Epilog Fusion Pro 48, offer large beds (1200x900mm) and speeds up to 165 inches per second. They’re built for mass-producing etched panels or glassware, costing $20,000-$50,000.
Desktop Laser Cutters
Compact desktop CO2 or diode models, like the Ortur Laser Master 3, fit small spaces and are great for beginners etching glassware or small decor. With 400x400mm work areas, they cost $800-$2,000.
A 40W-60W CO2 laser with a rotary attachment is a sweet spot for most glass etching, balancing power and price, as recommended by Monport.
Creative Ways to Use Laser Etched Glass
Laser etching on glass opens up a world of possibilities. Here are some fun and profitable ideas to spark your creativity:
- Custom Glassware: Etch names, dates, or logos on wine glasses, mugs, or tumblers for weddings or gifts. A set of personalized glasses can sell for $20-$50 each.
- Privacy Panels: Create frosted patterns on windows or shower doors for a stylish, private look. Think company logos or geometric designs for offices.
- Awards and Trophies: Etch glass or crystal plaques with text or logos for sports or corporate events, adding a classy touch, as shown in Epilog’s glass etching guide.
- Home Decor: Etch mirrors, vases, or candle holders with floral or abstract patterns. An etched mirror can fetch $100-$300 at craft markets.
- Jewelry: Etch tiny designs on glass pendants or coasters for boutique sales or Etsy shops.
- Photo Etchings: Transfer grayscale photos onto glass frames or ornaments for heartfelt keepsakes, a technique detailed by OMTech.
These ideas show how laser etching can turn simple glass into high-value creations, whether you’re crafting for fun or building a business.
Why Choose Laser Etching for Glass?
Laser etching stands out for several reasons, making it a top pick over other methods:
- Super Precise: With up to 1200 DPI, lasers nail tiny details, like fine text or photo textures, that sandblasting struggles with.
- Clean and Simple: No abrasive dust or chemicals—just a quick rinse after etching, unlike sandblasting’s messy cleanup.
- Fast Turnaround: Small designs take minutes, and complex patterns are quicker than manual or chemical etching.
- Safe for Thin Glass: Non-contact etching lowers cracking risks on delicate glass (0.5-3mm), per xTool.
- Lasting Results: Etchings are permanent, resisting wear, fading, or washing, ideal for everyday glassware.
- Low Environmental Impact: No abrasives or acids mean a greener process compared to sandblasting or chemical etching.
These advantages make laser etching a hassle-free way to create professional-grade designs.
Tips for Nailing Your Glass Etching
To get those picture-perfect etches, here are some tried-and-true tips:
- Pick the Right Glass: Soda-lime (common in bottles) or borosilicate (labware) etch cleanly. Avoid lead crystal, which can crack under heat, as warned by Focused Laser Systems.
- Test on Scrap First: Dial in settings—try 20-30% power, 300mm/s speed, and 500 DPI on a 40W CO2 laser. Too much power can roughen the etch.
- Use Wet Paper Towel: Place a damp paper towel on the glass for a bright, smooth etch. Turn off air assist to keep it wet, per Trotec.
- Clean the Glass: Wipe with isopropyl alcohol to remove dust or oils for a flawless etch.
- Optimize Designs: Use high-contrast, black-and-white images or SVG files. For photos, apply a 70% grayscale matrix and “Ordered Dithering” in LightBurn, as advised by Monport.
- Secure Your Workpiece: Tape flat glass or use a level rotary attachment for bottles to prevent slipping.
Start with cheap glass to practice settings, and you’ll be etching like a pro in no time.
Picking the Perfect Laser Cutter for Glass Etching
With so many laser cutters out there, here’s how to choose one that fits your needs:
- Project Goals: For glassware or small decor, a desktop CO2 laser (40W-60W) like the xTool P2 or Glowforge Pro is ideal. For large panels or bulk production, go for an Epilog Fusion Pro.
- Budget: Hobbyists can start with a diode laser ($500-$1,000) with pre-treatment or a CO2 laser ($2,000-$5,000). Businesses may spend $10,000-$50,000 on industrial models.
- Bed Size: Match the work area to your glass—400x400mm for small items, 1200x900mm for panels.
- Rotary Attachment: A must for etching bottles or glasses, included with most CO2 lasers.
- Software: Ensure LightBurn compatibility for easy design control and photo etching.
- Support: Pick brands like xTool or Epilog with solid customer service and warranties.
A 40W CO2 laser with a rotary attachment is a great starting point for most glass etching projects.
Keeping Your Laser Cutter in Top Shape
Maintaining your laser cutter and staying safe are crucial. Here’s what you need to know:
- Clean Optics: Wipe lenses and mirrors weekly with isopropyl alcohol to keep the beam sharp. Dirty optics weaken etches.
- Check Cooling: Ensure water cooling (CO2 lasers) or fans (diodes) are clear to avoid overheating.
- Ventilate: Use a fume extractor or vent to remove glass dust and fumes, keeping your workspace safe.
- Safety Gear: Wear laser safety glasses for open-frame lasers (Class 4). Enclosed lasers (Class 1) are safer, per OMTech.
- Avoid Over-Etching: Multiple passes over the same spot can crack glass due to heat, as noted by Focused Laser Systems.
- Inspect Regularly: Check belts, rails, and rotary attachments monthly for smooth operation.
A quick maintenance routine keeps your etches crisp and your machine happy.
FAQs About Etching Glass with a Laser Cutter
Can I etch any glass type?
Most glass—soda-lime, borosilicate, tempered—etches well. Avoid lead crystal, which may crack under laser heat.
How deep are laser etches?
CO2 lasers create surface etches (0.01-0.1mm); fiber lasers can go deeper (0.1-1mm) on coated glass.
Do I need special software?
LightBurn or RDWorks are best for precise control, supporting vectors and photo etching.
Is it safe for thin glass?
Yes, non-contact etching reduces cracking if you use low power and test settings, per xTool.
How long does etching take?
Small designs (50x50mm) take 2-5 minutes; larger patterns may need 10-30 minutes.
Conclusion
Etching glass with a laser cutter is a fantastic way to create personalized, eye-catching designs that pop. Whether you’re making custom glassware for a side hustle or frosted panels for a client, lasers offer precision, speed, and simplicity that sandblasting can’t always match. With a 40W CO2 laser, a rotary attachment, and tricks like the wet paper towel, you’re set to turn plain glass into something special in 2025.
Start small, play with settings on scrap glass, and don’t be afraid to get creative. Before long, you’ll be etching gifts that wow your friends or products that sell like hotcakes.