
A Comprehensive CNC Router for Glass Engraving Guide and Tips
A CNC router for glass engraving is a precision tool that unlocks vast creative and commercial potential. This technology automates the delicate process of carving intricate designs, text, and images onto glass surfaces. The use of a computer-controlled system ensures a level of accuracy and repeatability that is unattainable by manual methods. This guide provides a definitive overview of the process. It covers machine selection, essential tooling, operational workflows, and advanced techniques. Understanding these elements is crucial for any workshop aiming to master this sophisticated and valuable application in the modern glass processing industry.
Understanding the Fundamentals of CNC Glass Engraving
The foundation of high-quality results lies in a solid understanding of the core principles. CNC glass engraving is a specialized process. It requires a different approach than working with materials like wood or metal. It involves specific tools, parameters, and machine considerations. These are all designed to accommodate the unique brittle nature of glass. A successful operator must grasp these fundamentals before attempting any complex project.
What is CNC Engraving on Glass?
CNC engraving on glass is a subtractive manufacturing process. The machine uses a diamond-tipped tool to physically remove microscopic particles from a glass surface. A Computer Numerical Control (CNC) system directs the tool's movement. It follows a precise path defined by a digital design file. This creates permanent grooves and textures that form the desired image or text. The process can range from fine, shallow lines to deep, V-shaped cuts. The entire operation is a core capability of modern automated machinery, as detailed in our guide on how CNC glass machines work.
How Does a CNC Router Adapt for Glass?
A standard CNC router must be properly equipped and configured to handle glass. Key adaptations are essential for success. The machine's spindle must be capable of high speeds and must be liquid-cooled to prevent overheating during long jobs. A robust coolant delivery system is non-negotiable for most engraving methods. This system prevents thermal shock to the glass. The machine frame must be extremely rigid to eliminate vibration. Finally, the router uses specialized diamond tooling instead of standard carbide end mills.
Why is Engraving Different from Etching?
Engraving is fundamentally different from etching in its method and result. Engraving is a mechanical process. It uses a tool to physically cut or carve into the glass, creating depth and sharp, clear lines. Etching is an abrasive process. It uses fine particles to create a frosted, matte finish on the surface of the glass with minimal depth. The complete comparison in our guide, CNC glass engraving vs. CNC glass etching, explains that engraving produces a brilliant, sparkling effect, while etching creates a soft, diffused look.
Selecting the Right CNC Router for Glass Engraving
The selection of the machine itself is the most critical factor for success. Not all CNC routers are suitable for the demands of glass engraving. The machine must possess specific characteristics related to its construction, components, and control system. Investing in the right equipment from the outset prevents countless issues with quality and consistency. A comprehensive approach to this decision is vital, as outlined in the guide on how to choose a CNC glass machine for a workshop.
What are the Key Machine Specifications to Consider?
Several key machine specifications demand close attention. These features directly impact the machine's ability to produce high-quality engravings on a consistent basis.
- Machine Rigidity: A heavy, rigid frame made of steel is superior to aluminum. It absorbs vibrations that would otherwise transfer to the glass.
- Spindle Quality: A high-frequency, water-cooled spindle is essential for its thermal stability and precise control over a wide RPM range.
- Axis Drive System: Ball screw drive systems on all axes provide higher precision and less backlash than rack and pinion or belt-driven systems.
- Control System: A high-quality controller that can process complex toolpaths smoothly is necessary to avoid jerky movements that can mar the glass.
Why is Machine Rigidity Crucial for Glass?
Machine rigidity is crucial because glass is an unforgiving material. Any vibration or "chatter" from the machine will be instantly transferred through the engraving bit. This results in wavy lines, inconsistent depth, and microscopic chipping. A heavy, welded steel frame dampens these vibrations much more effectively than a lighter, bolted aluminum frame. The mass of the machine provides the stability needed to perform delicate operations on a brittle substrate. A lack of rigidity is a common point of failure for routers not specifically designed for hard materials.
What Role Does the Spindle Play in Engraving Quality?
The spindle plays a central role in engraving quality. A water-cooled, high-frequency spindle is the industry standard for glass work. Water cooling provides superior thermal management over air cooling. This ensures the spindle maintains a consistent temperature during long and demanding jobs, preventing thermal expansion that could affect the Z-axis depth. Furthermore, a high-quality spindle offers precise RPM control. This allows the operator to fine-tune the speed to match the specific tool and desired engraving effect, from slow, deep carving to high-speed polishing.
How Important is the Control System and Software?
The control system and software are the brain of the operation. Their importance cannot be overstated. A sophisticated CNC controller can read ahead in the G-code. This allows it to maintain a consistent speed around curves and corners. This feature, known as "look-ahead," prevents the machine from pausing or stuttering, which would create visible marks on the glass. The CAD/CAM software used to generate the toolpaths must also be capable. It needs to create clean vector paths and allow for detailed control over parameters like stepover and depth of cut. A seamless and powerful software-to-controller workflow is essential for complex designs.
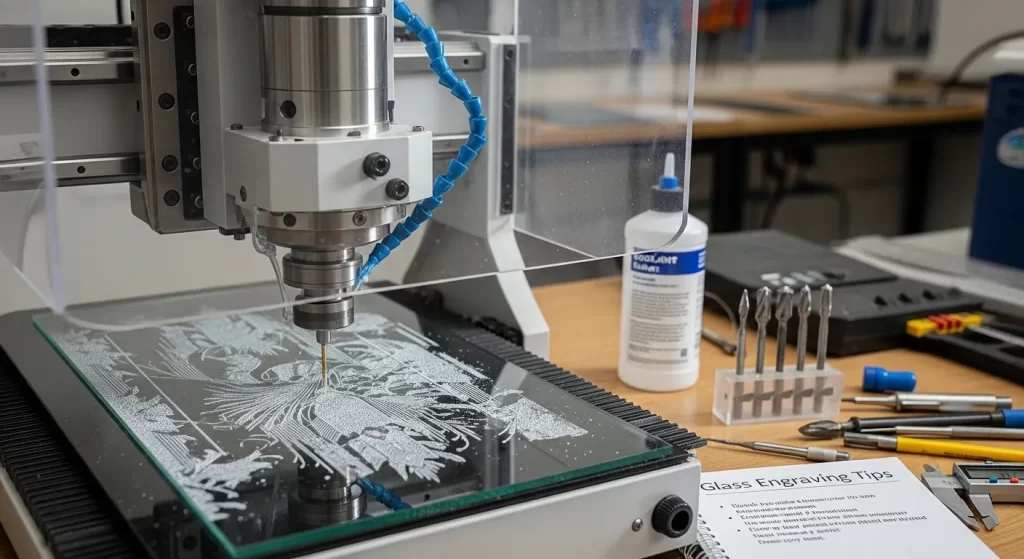
Essential Tooling for CNC Glass Engraving
The engraving bit is the point of contact where the digital design becomes a physical reality. The selection of the correct tool is just as important as the machine itself. Different tools are designed for different techniques and produce vastly different effects. An engraver's toolkit should include a variety of bits. This allows for flexibility in tackling any design, from fine-line art to deep, three-dimensional carvings.
What Are the Primary Types of Engraving Bits for Glass?
The primary types of engraving bits for glass fall into two main categories. Each category is suited for a distinct engraving method.
- Diamond Drag Bits: These are non-rotating tools used for scribing fine lines. They are ideal for detailed line art and text.
- Diamond Rotary Burrs: These are rotating tools that grind away the glass. They are used to create depth, filled areas, and V-carved effects.
- Polishing Bits: These are specialized rotary bits, often made of felt or a rubber composite. They are used after engraving to polish the carved areas.
How Do Diamond Drag Bits Work?
Diamond drag bits work by scratching or scribing the surface of the glass. The bit itself does not spin in the spindle. Instead, it is held in a spring-loaded holder. This spring provides consistent downward pressure, allowing the diamond tip to follow the contours of the glass surface, even if it is not perfectly flat. As the CNC machine moves the tool holder, the diamond tip is dragged across the glass. This creates a very fine, sharp line with a frosted appearance. This method is excellent for reproducing intricate details and delicate script.
When Should You Use Diamond Rotary Burrs?
Diamond rotary burrs should be used when the design requires depth, dimension, or filled-in areas. Unlike a drag bit, a rotary burr spins at high speeds. It uses bonded diamond particles to grind away the glass material in a controlled manner. This is a true subtractive process. It allows the operator to create grooves with significant width and depth. It is the go-to method for creating bold text, deep logos, and shaded areas. This process absolutely requires an active coolant system to prevent heat buildup.
What is the Purpose of Different Burr Shapes?
Different burr shapes are designed to create different profiles and effects within the glass.
- V-Bits: These cone-shaped bits are used for V-carving. The width of the engraved line is directly proportional to the depth of the cut. This allows for the creation of sharp, beveled-edge letters and designs with a sense of dimension.
- Ball-Nose Bits: These have a rounded tip. They are used to create soft, rounded grooves. They are also the primary tool for 3D contouring and carving, where a smooth, organic surface is desired.
- Flat-End Bits: These are used for clearing out flat-bottomed pockets or large filled areas. They provide a consistent depth across a wide path.
How Do You Select the Correct Tool for a Job?
Selecting the correct tool requires analyzing the design's requirements. For fine lines and intricate details, a diamond drag bit is the best choice. For bold letters with a beveled look, a V-shaped rotary burr is ideal. Often, a complex job may require multiple tool changes. The project might start with a rotary burr to carve out the main shapes and then switch to a drag bit to add fine details. Having a variety of the best CNC glass engraving machines and tools is key to versatility.
The Critical Role of Coolant in Glass Engraving
For any engraving process that involves a rotating diamond burr, a constant and reliable coolant supply is not just recommended; it is absolutely mandatory. The friction between the high-speed diamond tool and the glass generates intense, localized heat. Without coolant, this heat would cause immediate thermal shock. This would result in the glass cracking or shattering. Coolant is the lifeblood of the rotary engraving process.
Why is Coolant Non-Negotiable for Rotary Engraving?
Coolant is non-negotiable for three primary reasons. First, it prevents thermal shock. By instantly dissipating the heat generated at the point of contact, it keeps the glass temperature stable. Second, it lubricates the tool. This reduces friction, which extends the life of the expensive diamond burr. Third, it acts as a flushing agent. It washes away the glass powder, or slurry, from the engraved groove. This prevents the tool from becoming clogged and ensures a clean, consistent cut.
What Are the Common Coolant Systems for CNC Routers?
There are several common coolant delivery systems that can be adapted for a CNC router.
- Flood Coolant: This is the most effective system. It involves a pump that continuously floods the work area with a large volume of coolant from a reservoir. This provides the best cooling and flushing action.
- Mist Coolant: This system mixes a small amount of coolant with compressed air to create a fine mist. It is less messy than a flood system but provides less cooling capacity. It is suitable for light engraving work.
- Custom Drip Systems: For smaller machines, a simple gravity-fed drip system can be set up. This system drips coolant directly onto the tool from an elevated container. It requires careful monitoring to ensure a consistent flow.
How Do You Manage Coolant and Glass Slurry?
Effective management of the coolant and the resulting glass slurry is crucial for a clean workshop and consistent results. A flood coolant system should include a filtration and recirculation system. The used coolant and slurry are collected from the machine bed. They are then pumped through a series of filters to remove the glass particles. The clean coolant is then returned to the reservoir to be used again. This conserves water and prevents the abrasive slurry from damaging the machine's components. Proper coolant management is a key aspect of routine maintenance for CNC glass machinery.
Is Coolant Needed for Diamond Drag Engraving?
Coolant is generally not required for diamond drag engraving. Because the tool does not rotate, the friction and heat generated are minimal. The process is a gentle scribing action that does not risk thermal shock. However, some operators choose to apply a small amount of coolant or even just water to the surface. This can help to lubricate the tip. It also helps to contain the very fine glass dust that is created. This makes cleanup easier and results in a slightly cleaner engraved line.
Step-by-Step Workflow for a Glass Engraving Project
A successful glass engraving project follows a structured and methodical workflow. Each step, from the initial digital design to the final machine operation, must be executed with care and precision. A systematic approach minimizes errors, ensures safety, and leads to a high-quality final product. This workflow is a practical application of the principles used in any CNC glass working center setup.
How Do You Prepare the Digital Design (CAD/CAM)?
The process begins with a clean digital design. The artwork should be in a vector format (like AI, DXF, or SVG). Vector graphics are made of lines and curves, which a CNC machine can follow precisely. The design should be checked for any open loops or overlapping lines that could confuse the CAM software. In the CAM stage, the operator generates the toolpaths. This involves selecting the appropriate tool, setting the depth of cut, and defining the feed rate and spindle speed. A simulation of the toolpath should always be run to check for any potential issues.
What is Involved in Setting Up the CNC Machine?
Setting up the machine involves preparing both the workpiece and the machine itself. The glass sheet must be thoroughly cleaned to remove any dirt or oils that could interfere with the engraving or the clamping system. The appropriate engraving bit must be securely installed in the spindle collet. The coolant system must be checked to ensure it is functioning correctly with a clean filter and adequate coolant levels. The work area on the machine bed must be clear and clean.
How Do You Secure the Glass Workpiece?
Securing the glass workpiece is a critical step. The glass must be held absolutely flat and immobile during the entire engraving process.
- Vacuum Pods: For larger sheets, a vacuum table with movable pods is the professional standard. It provides strong, even clamping pressure without stressing the glass.
- Custom Jigs: For smaller or irregularly shaped pieces, a custom jig made from a non-marring material like MDF can be used. The jig holds the glass securely in place.
- Double-Sided Tape: For very small, lightweight pieces, high-quality, thin double-sided tape can be used. It is important to ensure the tape provides complete contact without creating any high spots.
What is the Process of Setting the Z-Zero on Glass?
Setting the Z-zero, or the top surface of the workpiece, is uniquely challenging on glass. The material is transparent and fragile. A mechanical touch probe could scratch the surface or even crack it if the approach speed is too high. A common manual method is the "paper trick." A thin piece of paper is placed on the glass surface. The operator slowly lowers the tool until it just barely touches the paper, creating a slight drag. At this point, the Z-axis is set to zero. Some advanced machines use non-contact laser sensors for this purpose.
How Do You Run the Engraving Job Safely?
Safety is paramount when running the job. Always wear safety glasses to protect against coolant splash or the unlikely event of glass fragmentation. Before starting the actual engraving, run the program a few inches above the glass surface. This "air pass" allows you to visually confirm that the machine is following the correct path without any unexpected movements. Start the job with the feed rate set to a low value. You can then gradually increase it to the optimal speed once you confirm that the engraving is proceeding cleanly. Continuously monitor the coolant flow throughout the entire job.
Optimizing Machine Parameters for a Perfect Finish
Achieving a perfect finish is a process of optimization. It requires finding the ideal balance between the key machine parameters: spindle speed, feed rate, depth of cut, and stepover. These settings are not universal. They must be adjusted based on the specific tool being used, the type of glass, and the desired artistic effect. Experienced operators often develop a "recipe book" of parameters that work well for different situations.
How Do Spindle Speed and Feed Rate Interact?
Spindle speed (RPM) and feed rate (the speed of machine movement) are intrinsically linked. This relationship is often referred to as "feeds and speeds." For rotary engraving, the goal is to allow each diamond particle on the tool to take a small, clean "chip" of glass. If the feed rate is too high for a given RPM, the tool will be forced through the material, leading to a rough finish and chipping. If the feed rate is too low, the tool will rub in place, generating excess heat and wearing down prematurely. The ideal combination results in a smooth cutting action and a clean finish.
What is the Correct Depth of Cut and Stepover?
The depth of cut and stepover are critical parameters for rotary burrs.
- Depth of Cut: This is how deep the tool goes into the material on each pass. For glass, it is always better to make multiple shallow passes rather than one deep pass. A shallow depth of cut, often just a few hundredths of a millimeter, reduces the stress on the glass and the tool.
- Stepover: This parameter is used when clearing out a filled area. It defines how much the tool moves over on each successive pass. A small stepover (e.g., 10-20% of the tool's diameter) will create a very smooth, uniform finish with no visible tool marks. A larger stepover will be faster but may leave ridges.
How Do You Achieve Different Engraving Effects?
Different engraving effects can be achieved by manipulating the tools and toolpaths.
- V-Carving: By using a V-shaped bit and a V-carving toolpath, the machine will vary the Z-depth to change the width of the engraved line. This creates a classic, chiseled look with sharp, three-dimensional letters.
- Cross-Hatching: To create a shaded effect in a filled area, the CAM software can be programmed to create two sets of toolpaths that run at 90-degree angles to each other. This cross-hatching creates a rich, textured appearance.
- Multi-Tool Operations: A design can be made more dynamic by using different tools. A ball-nose bit can be used for the main fill, while a sharp V-bit can be used to add a clean, beveled outline.
What Techniques Are Used for Post-Engraving Finishing?
After the engraving is complete, some minor finishing may be required. The engraved piece should be thoroughly cleaned with water and a soft brush to remove any remaining glass slurry from the carved lines. For some applications, the engraved surface itself can be polished. This can be done using small felt polishing bits and a cerium oxide paste. This process can be performed on the CNC machine itself, following the principles of CNC glass polishing techniques. This gives the engraved area a smooth, clear finish rather than a frosted one.
Advanced Techniques and Applications
Beyond basic line art and text, a CNC router for glass engraving can be used for a range of advanced applications. These techniques require more sophisticated software, a deeper understanding of the machine's capabilities, and often more powerful hardware. They push the boundaries of what is possible. They transform a flat sheet of glass into a complex work of art or a functional, high-tech component.
What is Photorealistic Engraving on Glass?
Photorealistic engraving involves translating a grayscale photograph into a format that can be engraved. This is typically done using a halftoning or dithering process in specialized software. The software converts the different shades of gray in the image into a pattern of fine dots or lines. The CNC machine then engraves this pattern onto the glass. The density of the dots or lines creates the illusion of shading and allows for the reproduction of highly detailed images. This technique is often performed with a diamond drag bit for the finest detail.
How Can a CNC Router be Used for 3D Glass Carving?
A CNC router can be used for 3D carving by employing a ball-nose rotary burr and a true 3D toolpath. The CAM software takes a 3D model (like an STL file) and generates a toolpath where the X, Y, and Z axes all move simultaneously. The machine makes many passes, with the ball-nose bit moving up and down to create a contoured, three-dimensional surface on the glass. This is a very advanced and time-consuming process. It requires a highly rigid 5-axis machine and a deep understanding of 3D milling.
What Are the Applications in Architectural and Decorative Glass?
The applications in architectural and decorative glass are vast. CNC engraving is used to create custom signage for corporate lobbies, intricate privacy screens for offices and homes, and decorative patterns on glass doors and partitions. It is also used to produce custom awards, trophies, and personalized luxury gifts. The ability to create one-of-a-kind or limited-run pieces with perfect precision is a key driver of its use in these high-value markets. This is a key area within the larger trend of CNC automation in glass processing.
Can a CNC Router Perform Other Glass Operations?
Yes, a properly equipped CNC router can perform other light glass operations beyond engraving. With the right diamond tooling and a robust coolant system, it can be used for light-duty drilling and milling. While it may not have the speed of a specialized CNC vertical drilling machine, it can certainly perform the functions outlined in our guide where CNC drilling and milling for glass is explained. This makes it a versatile machine for a custom fabrication shop that needs to perform a variety of tasks.
Troubleshooting Common Glass Engraving Problems
Even with a well-planned workflow, problems can arise. Troubleshooting these issues requires a logical approach. The operator must isolate the problem and identify the likely cause, which usually relates to the machine, the tooling, the parameters, or the workpiece setup. A systematic diagnosis is the fastest way to get back to producing high-quality work.
What Causes Chipping or "Shelling" at the Edges?
Chipping or shelling along the edge of an engraved line is a common defect. The most likely causes are:
- Dull Tool: A worn-out diamond bit will exert more pressure and act more like a hammer than a cutting tool.
- Feed Rate Too High: Pushing the tool through the glass too quickly does not give the diamonds enough time to abrade the material cleanly.
- Insufficient Coolant: Heat buildup can create micro-fractures that lead to chipping.
- Machine Vibration: A lack of rigidity in the machine frame or a loose component can cause chatter that results in a chipped edge.
How Do You Prevent Inconsistent Engraving Depth?
Inconsistent engraving depth is usually a problem with the Z-axis or the workpiece setup.
- Uneven Work Surface: If the spoilboard or machine bed is not perfectly flat, the glass will not be either. This will cause the depth to vary as the tool moves across it.
- Workpiece Not Secure: If the glass is not held down firmly, it can lift or bow in certain areas, leading to shallower engraving.
- Z-Axis Calibration: An error in setting the initial Z-zero or mechanical issues with the Z-axis drive system can cause depth inconsistencies.
What Leads to Tool Marks or Unwanted Lines?
Visible tool marks or ridges in a filled area are almost always a result of incorrect CAM settings. The primary cause is a stepover value that is too large. This leaves a small, un-engraved ridge between each pass of the tool. Reducing the stepover will create a smoother, more uniform finish. Unwanted lines can also be caused by tool deflection if the tool is extended too far from the collet or if the machine lacks the rigidity to resist the cutting forces.
Why Would a Diamond Bit Wear Out Prematurely?
Premature tool wear is a costly problem. The leading cause is running a rotary burr with inadequate coolant. The heat generated will quickly destroy the diamond bonding matrix. Other causes include using incorrect feeds and speeds. Running the tool too slowly can cause it to rub rather than cut, which also accelerates wear. Using low-quality diamond bits is another factor; reputable suppliers provide tools that last significantly longer. Following good tool care practices, as part of a larger maintenance schedule, is essential.
Conclusion
Mastering the CNC router for glass engraving is a journey that combines technical knowledge with artistic vision. It requires a deep understanding of the machine, the tooling, and the delicate nature of the material itself. By following a systematic workflow, carefully selecting and maintaining equipment, and methodically optimizing machine parameters, any workshop can achieve stunning, high-quality results. The ability to transform a plain sheet of glass into a detailed work of art offers a powerful competitive advantage. It opens up new markets and allows for the creation of high-value, custom products with unmatched precision and beauty.